Lately I have being playing with light a bit more than usual. After spending some time reading the Strobist blog http://strobist.blogspot.com/ I came up with the urge to make a different kind of photo using some found knowledge and an old idea I had running on my head for a while.
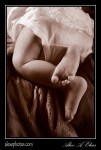
I wanted to have the light to come from an unusual place like in this picture here
http://photo.net/photodb/photo?photo_id=7397779&size=lg
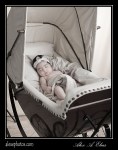
but I wanted a bit more of ambient light around like in this image here
keeping up with the concept and making some lighting modifications I came up with this image here.
Click on image to enlarge

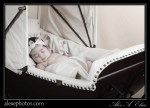
Pandora's box
On this picture, I got just enough ambient light to show around the room but not so much to detract from the the main idea of a mystery box. It took a bit of playing around with the position and power of the lights (3 of them) and some reflections until I got what I considered a decent balance of ambient light and flash light. So this is how I created this picture.
The camera was a Canon 7D with a 24-70mm f2.8L set at 30mm and f5.6, Speed 60th, ISO 125. The flashes were triggered with Pocket Wizard Mini TT1 and the AC3 controller and 3 Pocket wizards Flex TT5 one on each zone A,B,C for fine control.
The first test picture I took was with the accent lampt by itself to determine the ambient light, color temp and exposure I needed for that side of the frame. Then I set up a Canon 580 EX @ 1/64 power with a snoot to shoot a controlled beam of light over the boxes on the side table ( I ended up gelling the flash with 3/4 CTO to compensate with the existing light from the lamp) and then set the camera withe balance to 4600K. The next step was to power Pandora’s box. There I put a Canon 430EXII @ 1/16 of its power with a 1/2 cut CTO and covered it with a paper towel to diffuse the light, also I lined the back of the lid box with foil to reflect light into her face from the front since the single light coming from the box was giving me some weird spooky shadows that I did not care for. With those two lights I ended up getting something like this picture bellow and that was the look I was trying to avoid. To dark around her.
Click on image to enlarge.

That is when the third light comes in to the rescue and made all the difference. Another Canon 580EXII at 1/16 power, set at 50mm and gelled with a 3/4 CTO cut . The placement of this light is the trickiest one since is the one that is doing a double duty (I learned this one at the strobist site on the lighting 102 files) this is the light that opened up the shadows on the left side to the frame (primary function) but it also created the reflection (specular light) on the headboard that defined and separated her head from an otherwise black background. The tricky part about this light is that it has to hit the headboard to create the reflection behind your models head and that reflection is what creates the separation we are looking for. Therefore the angle of the light and the one from the camera have to coincide in the right place and that is when the fine tuning part comes in. I will write a post about that but make sure you check the strobist site to get more details about it.
The one last thing that helped me wrap this image was the reflection of the lamp on the lid (I really like that) I have a few without it and I did not liked them as much, the lid looked to dark and flat. Small details like that make a big difference at the end.
Here is a quick image that shows up the set up I used to get this image done.
Click on image to enlarge.

Thanks for stooping by and as usual I’d appreciate any comments or questions. I also welcome ideas for new topics.
Regards
Alex Elias
PS: A bigger and special thanks to my wife that put up with my ideas when coming tired from work.