Lastolite EZ Box VS Calumet Speed Box

For the last few years I own a Lastolite EZ Box 24″x24″ (With the silver interior) and I like it a lot. It is quite versatile, easy to set up and transport and most important I like the quality of light I get with it. On the other side I feel it is on the pricey side for it’s quality. I believe I spent somewhere close to $200 for the box and the bracket. At that cost I would have like to receive a metal flash bracket holder as supposed of the plastic one they provided. The black elastic band surrounding the edges, wore out on one side and now there is a small section on the box showing its metal rib that shapes the box. Back when I got it it came inside a caring bag large enough to fit a sliced bread sandwich. I was able to take it out but is not worth performing the double twist and forcing it back every time you need to use it. To me, the caring case it was worthless.

Two days ago I found out that Calumet is going out of business and I stopped by their store to see what I could find. I ended up purchasing a Calumet 24″ Speedbox for $59 and a beautiful, strong metal bracket for $39. Granted it was on sale therefore I did save about $50 to $60 from retail price between the 2 items. I can’tt say that the box itself it’s better or worst in terms of construction compared to the Lastolite. The fabric does feel a bit thicker though. The lastolite EZ Box does have an internal diffuser that the Calumet speed box lacks. The last noticeable thing between them is that the Calumet Speed Box came with a great caring bag that fits the box perfectly.

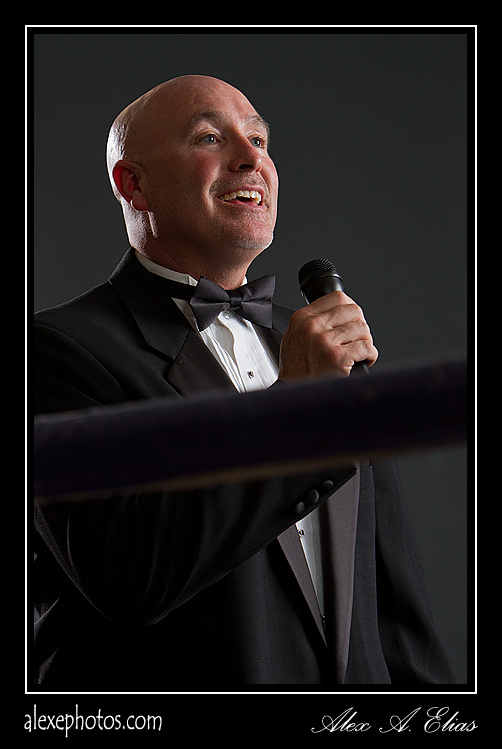
Here are 2 images I took of my trusty model Niky. She did not move a muscle during this trial therefore we can see the difference in illumination between these two boxes quite clearly.  I used a Canon 7D with a Canon EF 80mm f1.8 set to manual mode iso 400, speed @ 250th, f8, and manual color temp to 5500K. For the first image I used the Calumet Speed box with  Canon flash 580EXII set to manual at 1/64. I took the picture and then removed the box from the stand and replaced it with the Lastolite. I used the same flash unit to make sure the light source was the same and although the Lastolite EZ box comes with the internal buffer and needs more light output to compensate for that, I decided to leave the light power set at the same to see in real life the actual difference. (in Lightroom 5.5 I estimated that if I increased the exposure by .6o I would get about the same exposure)


Click on images to see large.


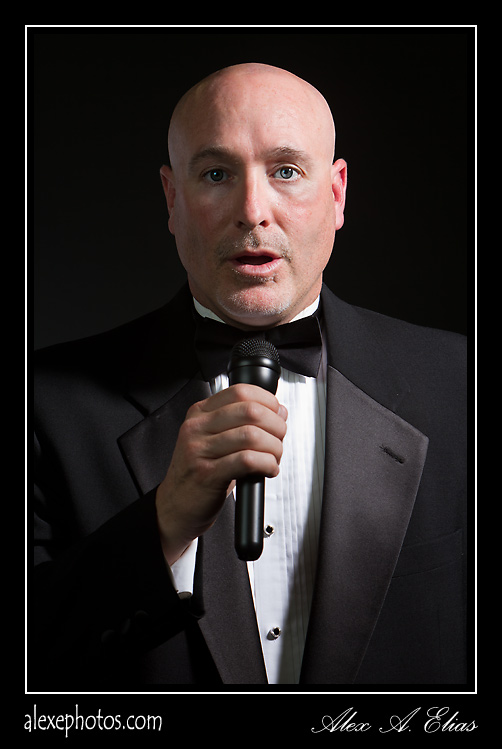
The picture on the left side was the one taken with the Calumet Speed Box and the one to the right is the one with the Latolite EXBox. These images are SOOC “straight out of camera” with the exception of adding .60 more exposure on Lightroom 5.5 to the image taken with the Lastolite, there is no other adjustments of any kind. No color correction sharpening etc, etc.


Again the image on the left is the one taken with the Calumet Speed Box and the one to the right with the Lastolite EX Box cropped 100%.


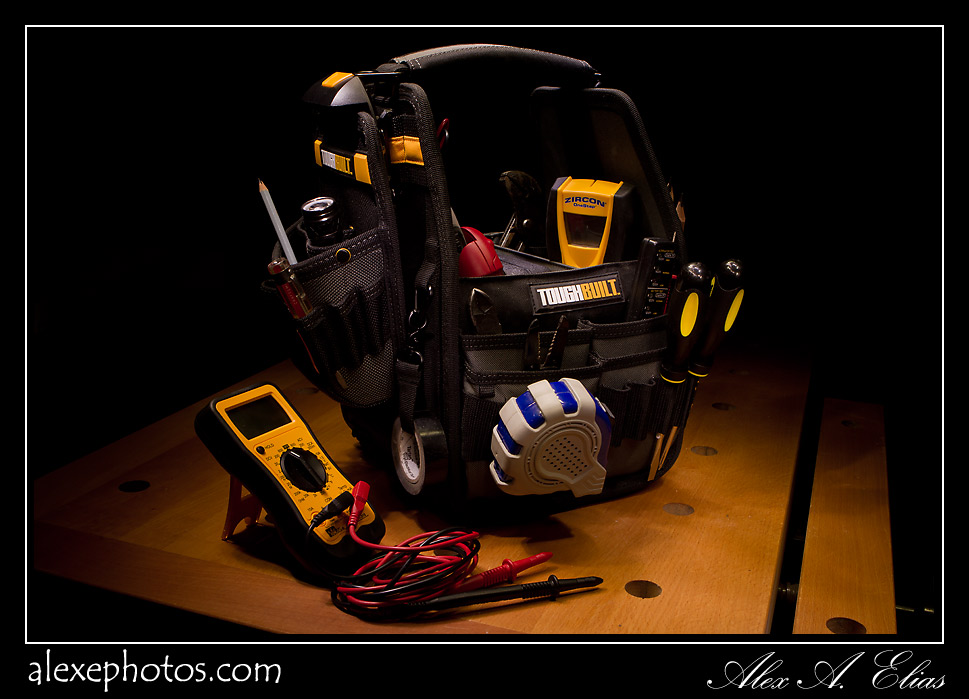
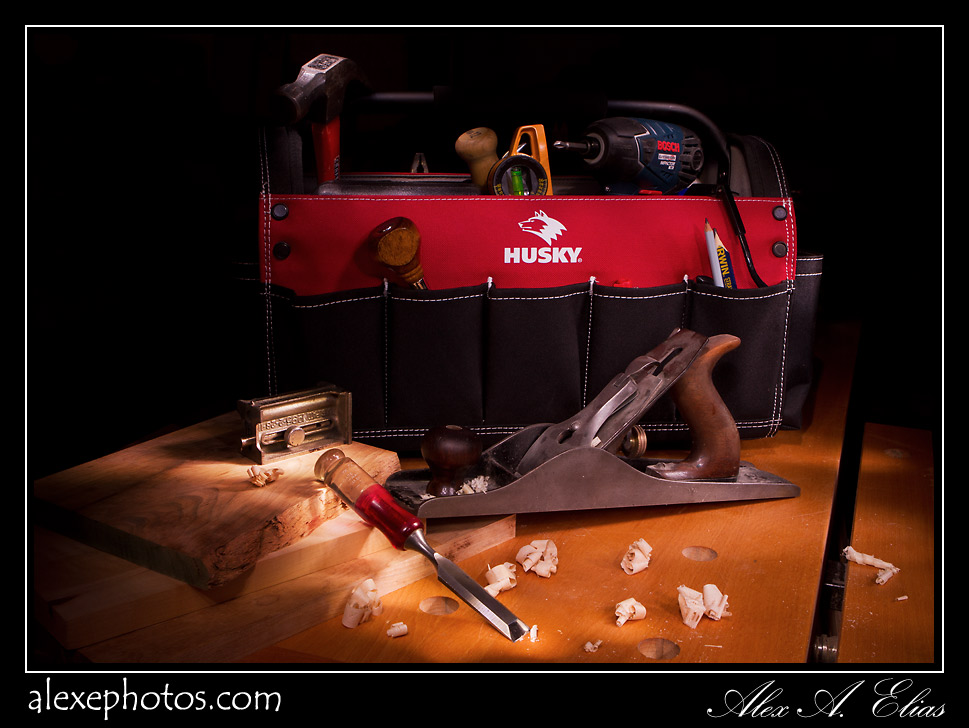
And the last two images are in the same order. Calumet Speed Box on the left and Lastolite EX Box to the right side. the only thing I did to these pictures was bringing the withe balance to the same values on Photoshop CC .Altough I used the same color temp to take both images the boxes show there is a difference and the background shows it quite well. I selected a point on the background right above her hear and took a reading of the RGB and brought the values on those two spots to be the same R30 G30 B30.

So the results…

It’s up to you. You have some of the facts here. Seems like the shadows at 100% are a bit softer on the Lastolite EZ Box; since it has an extra layer of diffusion it was expected. I’n my mundane world I can’t see that fact to make such a big difference. In terms of color cast, that should not make that much of a difference on this digital world. (It might if you mix them in the same shoot since you will have warmer and color tones in the same image)

If you have any thoughts you like to share about this topic or post fell free to make any comments.

Regards,

Alex Elias

Advertisement

Single light source portrait.


Here is a portrait done with a single light. Since the light source was relatively large compared to her and it was not far, I was able to get the look I was after without the need of additional lights or bounce cards.

The strove was an Einstein from Paul Buff fitted with a 35″ octabox. I attached a grid to the Octa to direct and guide the light more precisely. That “on my opinion” makes the light a bit punchier adding a touch more contrast and also it kept the light from spilling over to the background.

The portrait was shot with a Canon 5D MrkIII and a Canon ef 70-200mm f 2.8 is L. A Pocket wizard Mini TT1 and Pocket Wizard power MC2 were transmitting and receiving to power the strove.

And that is how I shot this portrait with a single light source.

Here is a diagram with the light set up.

Natalie's

Natalie's Portrait


This last portrait here shares the same lighting concept of the first one with the exeption of … You guess right, a rim light coming from camera right behind the subject. “In relation to the subject the light was positioned at about 2PM”

Since he was not rearing a cute fuzzy white hat like she was. I wanted a bit of separation between the dark background and his dark hair, and that light did exactly that.

Dani's Portrait

Portraits with Canon 5D MrkIII

This past weekend I tried a simple lighting set up with my daughter Sofia prior to shooting some head shots of Lucca, a cute young actor.

The lighting set up was basically a main light. Paul C Buff Einstain E 640 with an Octabox and a grid on it to better direct the light. The strobe was placed overhead at 45deg angle. Lucca (the model) was holding a small gold and sliver reflector on his lap to bounce light back into his face as a fill. The other light source was a rim/hair light. This was a Travelite 750 fitted with a 10″ reflector and a 40deg grid to avoid light spill and lens flare. The pictures were done with a Canon 5D MrkIII and a Canon 70-200 ef 2.8 IS L set at f8.

Below it’s a simple diagram of the lighting set up for this two portraits.

Lucca Lighting set up


Sofia's Make up

Lucca-Monti

A dash of color.

I recently took some pictures of Kassandra. Las night I revisit some of the images and decided to try something different. Since she often change her hair color and look, I decides to add a DASH OF COLOR to it and I came up with this image.

The original image was taken  with a Canon 5D Mrk III set at ISO 100 and speed of 200. White balance was manually set at 5600K. The lens is Canon EF 70-200 f2.8 IS L set a f9. The light is from a Paul Buff Einstein E640 and a 36″ Octa with a grid positioned very close to her face at 90 Deg and as a rim light I used a Canon EXII 430 set to manual mode. Black background and everything was triggered with pocket wizards.

Nothing extraordinary or new in concept, but fun and different. I did this playing around with layers and blending modes on Photoshop.  When I can’t sleep, I find it therapeutical to do some edits or watch  tutorials that will teach me some new photoshop tricks and techniques.

Adding a DASH OF COLOR to an image every now and then could be fun. I like the result. I will keep on playing with this idea and see if I can come up with something else along the lines.

#dash of color

Touch of Color

Dash of Color


Self portrait. Half winter Half summer.

This is the year when I get to celebrate half of my birthdays on the northern side of the glove. The first half where celebrated on the southern side of the Ecuador, Argentina to be more precise.

Due to the occasion, I thought to make a SELF PORTRAIT showing half of me in a summery look and the other half of my face resembling winter, like a Jack Frost kind of look.

For this project I used a Canon 5D Mrk III with a Canon EF 85mm f 1.8. I used a single light source, which was a Paul Buff Einstein E640 with a large silver beauty dish with a sock “diffuser”. The light was placed high-up  right in from of me, pointing about 45 deg into my face.

The rest was done as you might imagine with Photoshop. A bunch of layers and some hours of moving pixels around.

Thanks for looking. and Happy Holidays to you all.

Half winter Half summer

Picture of the day. The new iPad III pictures

For Christmas 2011 My dear wife got me an iPad that I have been enjoying  a lot. Now that her birthday it’s coming, it is time to get even and I got the new iPad for her.

The  original lighting setting for this pictures was done with one Travelite 750 set to 1 o clock with a 11″ reflector and a 30Deg grid. I used a flag beneath the reflector to block the light a bit on the white background behind the box. At 7  o clock I position a white bounce card to open up the shadow on the front left side of the box. After a few shots I decided to add a second light to color the background and that was done with a Canon 580 EXII with two cuts of blue gel. All the lights were triggered with a Pocket Wizard Mini TT1 and Flex TT5.

The Camera I used is a Canon 5D Mark III with a Canon EF 24-70 f2.8 L. White balance I think it was set at 6000K,  iso 100  F14  speed 200th.

Here is the original shot I took

Click on it to enlarge.

I kind of like the first picture but I wanted to incorporate the actual iPad to the image.

 Click on it to enlarge.

Then I decided to be creative and start playing with colors and that is when the Canon 580EXII came in. Also I turned on the iPad so it would look cool with a picture on the screen.

Click on it to enlarge

When saw that third image I did not care for it.  The exposure was not nearly enough to record the screen (IT WAS ON FOR THIS PICTURE)  and I think the crop did not look right at all, it was like a black square in front of the box. Then I recomposed the image and started trying to light the display with a third light in such way that it would show the image. Needless to say it did not matter what I did or where I positioned the light, the darn display was too dark or I ended up reflecting light into it or got a bunch of glare on a black screen. That is when I did something I don’t do often… Think. The answer pop right into my head.

The exposure for everything but the screen was already done with the flash, the camera was steady on a tripod. The flash duration is quite fast, therefore it did not mater the shutter speed being at 200 when nothing is moving. Now are you thinking what I’m thinking? You’re right. Turn of the ambient light and work on total darkness, take a picture for 30″ and see what happens. Bingo, the box and background are exposed by the flash and the screen it exposed using it’s own light. (I had to play with the exposure time to get it right, it ended up being 5″or 10″) and that is it.

Click on it to enlarge.

By the way, the picture on the display is my wife reading my iPad. I took that picture a few months ago and I thought it was going to be cool to use that image for this one.

If you have any comments or thoughts I would certainly appreciate if you leave some feed back.

Regards to all.

PS: If you made it all the way to the end here is a bonus picture of the settings.

Click on it to enlarge.

iPad setting

Pandora’s Box. Portrait and lighting technique

Lately I have being playing with light a bit more than usual. After spending some time reading the Strobist blog http://strobist.blogspot.com/  I came up with the urge to make a different kind of photo using some found knowledge and an old idea I had running on my head for a while.

I wanted to have the light to come from an unusual place like in this picture here

http://photo.net/photodb/photo?photo_id=7397779&size=lg

but I wanted a bit more of ambient light around like in this image here

keeping up with the concept and making some lighting modifications I came up with this image here.

Click on image to enlarge

Pandora's box

On this picture, I got just enough ambient light to show around the room but not so much to detract from the the main idea of a mystery box. It took a bit of playing around with the position and power of the lights (3 of them) and some reflections  until I got what I considered a decent balance of ambient light and flash light. So this is how I created this picture.

The camera was a Canon 7D with a 24-70mm f2.8L set at 30mm and f5.6, Speed 60th, ISO 125. The flashes were triggered with Pocket Wizard Mini TT1 and the AC3 controller and 3 Pocket wizards Flex TT5 one on each zone A,B,C for fine control.

The first test picture I took was with the accent lampt by itself to determine the ambient light, color temp and exposure I needed for that side of the frame. Then I set up a Canon 580 EX @ 1/64 power with a snoot to shoot a controlled beam of light over the boxes on the side table ( I ended up gelling the flash with 3/4 CTO to compensate with the existing light from the lamp) and then set the camera withe balance to 4600K. The next step was to power Pandora’s box. There I put a Canon 430EXII @ 1/16 of its power with a 1/2 cut CTO and covered it with a paper towel to diffuse the light, also I lined the back of the lid box with foil to reflect light into her face from the front since the single light coming from the box was giving me some weird spooky shadows that I did not care for. With those two lights I ended up getting something like this picture bellow and that was the look I was trying to avoid. To dark around her.

Click on image to enlarge.

That is when the third light comes in to the rescue and made all the difference. Another Canon 580EXII at 1/16 power, set at 50mm and gelled with a 3/4 CTO cut . The placement of this light is the trickiest one since is the one that is doing a double duty (I learned this one at the strobist site on the lighting 102 files) this is the light that opened up the shadows on the left side to the frame (primary function) but it also created the reflection (specular light) on the headboard that defined and separated her head from an otherwise black background. The tricky part about this light is that it has to hit the headboard to create the reflection behind your models head and  that reflection is what creates the separation we are looking for.  Therefore the angle of the light and the one from the camera have to coincide in the right place and that is when the fine tuning part comes in. I will write a post about that but make sure you check the strobist site to get more details about it.

The one last thing that helped me wrap this image was the reflection of the lamp on the lid (I really like that) I have a few without it and  I did not liked them as much, the lid looked to dark and flat. Small details like that make a big difference at the end.

Here is a quick image that shows up the set up I used to get this image done.

Click on image to enlarge.

Thanks for stooping by and as usual I’d appreciate any comments or questions. I also welcome ideas for new topics.

Regards

Alex Elias

PS: A bigger and special thanks to my wife that put up with my ideas when coming tired from work.

Photo of the day. Portraits inside of a picture frame.

Nothing new that hasn’t been done before but always fun to try. In a effort to organize my garage I stumbled into this frame and decided to use it for some fun portrait session.

The set up was not complicate it at all just a backdrop and a picture frame that I hung with a wire to the necessary eight. The light source was a Travelite 750 with a Photoflex 36″x48″  softbox place to camera left and a White reflector to the right to fill in the shadows. The Camera was a Canon 7D and the lens a Canon EfS 10-22 set a the 10mm end (to make it more cartoon looking, since I wasn’t going for the glamour look) set the lens at f 5.6. Iso was 100  speed 250 and custom white balance. The flash was triggered with a Pocket Wizard Mini TT1 and a Flex TT5.

The one thing I would recommend to make the post work simpler is to try to keep the frame as square as possible to the camera’s sensor plane to avoid to much distortions, specially working with such wide angle lens. Once in Photoshop I corrected the perspective to make the frame square before I did anything else. once the frame was square enough I made a selection of the subject put it on it’s on layer, created a new background  and added a drop shadow the the bottom right side of the frame.

Thanks for looking and as always do not hesitate to comment or ask any questions, I do appreciate both.

Regards

Alex


Click on image to see larger.

Ring announcer portraits.

Here are a few portraits I took of my friend Barrie. He’s a ring announcer for boxing and MMA. We did a quick session at a local boxing gym to update his business cars and some other media. The place was challenging due to very limited  space  and unattractive surroundings but it ended up working out.

The equipment used for the shot was a Canon 7D with a Canon EF 24-70 f 2.8L and Canon EF 70-200 f 2.8 is L The lighting was primarely done with 2 Calumet travelite 750, one was fitted with a Photoflex 48×36 soft box and the other one with an 11″ reflector with a 30 deg honeycomb grid. For some other shots I added a third light source, a 24″x24″ Lastolite soft box with a Canon 580 EXII. The lights were controlled by Pocket Wizard Mini TT1 and Flex TT5.

Thanks for looking and a special thanks to Barrie.

Click on image to see larger.

Picture of the day. Painting with light II

Here are a few more images done with an LED flashlight. The basic idea an camera settings are the same as in my previous post https://alexephotos.com/2011/11/08/photo-of-the-day-painting-with-light/

Again thanks for looking and following the blog.

Make sure to ask any questions you might have, or if you have any comments or ideas feel free to post them.

Regards,

Alex Elias

Click on  image to enlarge.