
On the first post I mainly talked about the equipment that I took with me and a little bit about exposure compensation. Here I will go over a bit more about some of the setting I normally use.
As I mentioned on the first part, in my opinion the only three settings worthwhile using are the ones that gives me full or most control over the creative process and those are.
Aperture priority. AV for Canon and A for Nikon shutters. When shooting in this mode one can choose the f stop and the camera will select the correct speed for the aperture you selected. This setting will let the shooter decide how much from foreground to background is sharp. The higher the number, the greater the portion that will be within acceptable focus. Having a large area in focus might be what you are after if you are shooting landscapes, on the other hand, shooting outdoors portraits normally benefits from a shallower focus (narrow depth of field) therefore selecting a lower number and blurring the background might be the way to go.
Speed priority. TV for Canon and S for Nikon shutters.This setting does the exact opposite. It let you choose the speed needed while the camera choose the correct aperture for selected speed. When taking pictures of kids playing in the park, sports etc, one wants to set the camera to a speed that can stop the action. If you are shooting landscapes and there is a river with a beautiful waterfall for example, then you might prefer to have a low speed to capture the movement on the water.
Manual. M for Canon and Nikon shooters (one of the few things they agree on) This is the one setting most people fear to even touch and is the one that let’s do take full control over your camera. Here you select the right combination of both speed and depth of field.
With that in mind, depending on what I’m photographing is which of the three settings I will use. If I’m dealing with architectural things like city buildings and other stationary things, most likely I’ll be shooting in manual mode, if I’m just walking around waiting for something to happen or just jutting away to nothing in particular chances are the camera is set to AV.
White balance. Cameras now days have quite a few predetermined setting for different kinds of lightning. Automatic white balance is the most common if one is going to be walking around. Unless you are in a place where the color temperature is constant Auto is the way to go. The cloudy setting is pretty useful also when shooting portraits outdoors, even if it isn’t cloudy since it will warm up the scene a bit but the skin tones on people will look a bit better as well.
Focusing points. Majority of modern cameras will come with a cluster of focusing points on the screen. Many people select all an let the camera set focus on either one of them (big mistake) many times the camera will choose to focus on the part of the frame that wasn’t what you wanted. At the end of the day you’ll be asking yourself why so many pictures are out of focus. If you can select a specific one do yourself a favor and select just a single one, every time you aim at your subject with that point you know that that the camera will lock the focus right on that spot.
Raw or J peg. Why not both? If you already spends hundreds on equipment, spend a few more dollars and get more memory cards if space is your concern. I always set the camera to shoot the largest RAW and small J peg’s. I rarely use the J peg files but if I want to share the pictures quickly with someone I can download those pretty fast.
Hands down the RAW files will beat J pegs every time when it comes to amount of info, plus the camera presets such as sharpening, contrast, saturation ETC are no embedded on the file. You will be surprised the amount of data contained in the RAW files, also iIf you have over/underexposed files, wrong color balance and some other errors RAW is the best way to recover.
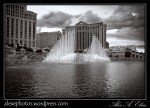
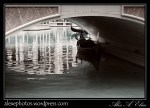
Here are some more images from Vegas.


As always, thanks for stopping by, and I welcome comments, questions or ideas.
Alex Elias

